Introduction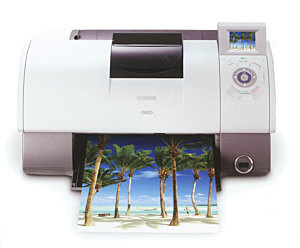
The i900D was introduced by Canon in September 2003 and I first saw one in action at the Photo Plus Expo show in New York in October. Canon kindly loaned a sample to photo.net for review and this article is the result. Rather than run the printer though a series of lab test and describe every option and every software screen, I though a better way to review it was to actually use it in the same way a typical purchaser might. Is it easy to assemble? Is the software easy to install and use? Does it make good prints? How long does the ink last? Finally of course, are there any problems or things that have been left out that shouldn't have been. Read on and I'll try to answer these questions...
Canon i900D Technical Specifications
A full listing of all the technical specifications can be found on the specs page. You can also download copies of the printer manuals in PDF format directly from Canon if you want a full technical description of all hardware and software options.
Briefly here are the major features:
Photo printer using 6 ink system
Inks individually replaceable
User replaceable print head
Built in memory card reader and LCD screen
Printing directly from memory card
Printing directly from compatible digital cameras
Borderless printing option
Setup
To properly test setup I tried the method most likely used by the average consumer. Dive into the box and start putting things together. Only read the instructions as a last resort. Turns out mechanical assembly ofthe printer was quite simple. After removing several hundred (well, maybe a dozen) strips of orange tape holding parts in place all that was required was first to open the package containing the print head assembly, insert it into the printer and lock it into place. Simple. Then open each one of the 6 ink cartridge packets and snap each one into its correct slot (all of which are labeled). The only thing here is to make really sure you put the right color ink in the designated (and clearly labeled) slot. If you put your yellow ink in the magenta slot, your prints will look very strange, and it will take you forever to flush the incorrect color ink out of the system.
The only other assembly required is to attach the 4x6 paper holder to the printer if you want to load 4x6 paper at the same time as 8.5x11 paper . Takes 5 seconds as it more or less just drops in place.
At this point you can plug the printer in, load some paper, stick a memory card in the slot and make a print! No PC or camera required. There's a small (2") LCD to tell you what to do (though reading the instruction manual isn't a bad idea). You can select an image, select a paper size, crop if necessary, chose from a few printing options and make your print.
I installed the supplied software on a PC running Windows XP. The most important thing here is that you need to install the software BEFORE you attachthe printer . If you don't, XP will recognize new hardware and attempt to install it's own drivers for what it thinks you've just attached. This should be avoided. All you need to do is first load the software CD and follow the instructions to loadthe printer driver and the memory card driver. When that's all done, THEN you can attach the printer, XP will recognize new hardware and it will use the Canon drivers which you have just loaded to control it.
There were no bugs during installation. Everything went along as the manual indicated it should.
Memory card reader
The i900D has a built in memory card reader that can either be used to transfer data to a PC via the USB link, or the printer can directly print images which are stored on the card. It's compatible with Compact Flash, Microdrives, Smart Media, SD cards and Multimedia cards. Direct printing from the card supports JPEG (DCF/CIFF/EXIF 2.3 or earlier /JFIF), TIFF (EXIF compliant) and DPOF compliant. It does not support Canon RAW files, these have to be externally converted to JPEG or TIFF before they can be printed.
Time to transfer 30 files (94MB) from a Viking 512MB CF (speed not specified) card in the i900D to an HP Pavilion a230n (AMD 2800+) was 150s, giving a transfer speed of 626 kBytes/s. For comparison, the built in card reader in the a230n (which is USB connected also) took 90s for the same transfer, a speed of 1.04 MBytes/s. These numbers no doubt reflect limitations due to the maximum read speed of the CF card rather than the USB maximum data transfer rate. The USB interface itself if 2.0, theoretically capable of up to 400 megabits/s data transfer.
If you don't already have a memory card reader, this is a useful function. Normally it's far more convenient than having to connect your camera to a PC to download images, so this is a positive feature of the i900D.
i900D vs i960
The i900D and i960 are very similar printers. The main difference is in print speed and the presence of the memory card reader.
The i900D has a built in memory card reader which allows you to make prints directly from a memory card, or to transfer the contents of the memory card to a PC. The i960 on the other had lacks the memory card feature, but makes up for it with twice the print speed due a a largerprint head . If you don't think you'll ever use the memory card functions of the i900D, then the i960 looks like a better buy. Not only is it faster, but it seems to sell on the street for around $40 less then the i900D.
The Inks and the Print Head
The i900D uses six inks. The usual black, yellow, magenta and cyan, plus photo magenta (light magenta) and photo cyan (light cyan). This is the normal six ink color set used by other printer manufacturers such as Epson. The i900D has a separatecartridge for each ink, so you only need to replace one color at a time. On some other printers the color inks come combined in one cartridge, so if, for example, the magenta ink runs out, you have to replace ALL the inks , even if there is ink of the other colors left. Another nice feature is that the ink cartridges are transparent! So you don't have to wonder if the "low ink" warning is lying to you just to make you buy more ink. You can take out thecartridge and actually see how much ink is left. The ink monitoring is done optically and is supposed to give a warning when less than 20% of the ink is left. This is preferable to a system which counts the number of times the head operates and calculates how much ink should be left in the tank. The ink cartridges are dumb. They contain no chips which monitor usage and prevent you from refilling them. That's your decision. Again a plus for Canon.
One minor problem is that the ink level shown on the printer monitor screen is either full or "empty" (see below). The software doesn't know what the ink level is until it drops to the point where the optical sensor detects that it's low. This isn't really a problem since you can just take out the inkcartridge and look how much ink is left, but it could be confusing if you don't realize what's going on.
If you find this article useful, please consider making a donation to the author. Thank you!
Thanks to John Henry for Donation